Intro to PHP Part 5, Forms and user input
In this post, we'll create an HTML form and use PHP to handle submitted values. Understanding how to handle forms is important for developing most websites. First, we'll write the HTML form its self. Then, we'll write a PHP program that will receive and process the resulting form input. To create the HTML form, start with the form tags which look like this:
1
2
3
<form action="process_form.php" method="post">

</form>
Notice the action="process_form.php" part of the form tag. This controls which PHP file will be processing the HTML form. You'll also notice the method="post". There are two different form "methods" that are commonly used. There is method="post" and there is method="get". A "get" method means that the user input will be visible in the URL, for example http://something.com/script.php?name=Miles&gender=M The advantage of a "get" method is that the form's inputed values can easily be bookmarked by the user. The major disadvantage of the "get" method is security. anybody could just change those form values to whatever they wanted, and get around any input validation you may have set up to protect yourself from hacks. We'll get into input validation later on, but for the purposes of this series, I'll always lean toward the "post" method unless I have a very good reason not to.
Anyway, to get started, just make a new file called form.html
1
2
3
4
5
6
7
8
9
10
11
12
13
14
15
16
17
18
19
20
21
22
23
24
25
26
27
28
29
30
<!doctype html>
<html lang="en">
  <head>
    <meta charset="utf8">
    <title>form</title>
  </head>
  <body>
  <form action="process_form.php" method="post">
  	  <fieldset>
  	  	<legend>Tell us about yourself!</legend>
  	  	<p><label>Name: <input type="text" name="name" size = "20" maxlength="40"></label></p>
  	  	<p><label>Email: <input type="email" name="email" size="40" maxlength="50"></label></p>
  	  	<p><label for="os">What's your favorite operating system?</label><input type="radio" name="os" value="Windows">Windows
  	  	<input type="radio" name="os" value="Mac">Mac
  	  	<input type="radio" name="os" value="Linux">Linux</p>
  	  	<p><label>What's your favorite browser?
  	  	  <select name="browser">
  	  	  	<option value="chrome">Chrome</option>
  	  	  	<option value="firefox">FireFox</option>
  	  	  	<option value="safari">Safari</option>
  	  	  	<option value="other">Other</option>
  	  	  </select>
  	  	</label>
  	  </p>
  	  <p><label>Message to us: <textarea name="message" rows="3" cols="40"></textarea></label></p>
  	  </fieldset>
  	  <p align="center"><input type="submit" name="submit" value="Send my information"></p>
  	</form>
  </body>
</html>
Break it down!
Once again, I'll break this code into small chunks, and discuss them in detail.
1
	<form action="process_form.php" method="post">
This form's action attribute points to a file called process_form.php, which we will create in the next step.
1
2
3
	<fieldset>
  	  	<legend>Tell us about yourself!</legend>
  	  	...
The fieldsettags help group the form's content and add a box around it. This is optional, but I like the way it looks.
1
2
		<p><label>Name: <input type="text" name="name" size = "20" maxlength="40"></label></p>
  	  	<p><label>Email: <input type="email" name="email" size="40" maxlength="50"></label></p>
These are textarea boxes for users to enter their name and emails. The label tags are used to associate each text label with it's corresponding input area
1
2
3
	<p><label for="os">What's your favorite operating system?</label><input type="radio" name="os" value="Windows">Windows
  	  	<input type="radio" name="os" value="Mac">Mac
  	  	<input type="radio" name="os" value="Linux">Linux</p>
Radio buttons can only be selected one at a time. since these radio buttons all have the same "name" then only one can be seleced at a time.
1
2
3
4
5
6
7
8
9
  	  	<p><label>What's your favorite browser?
  	  	  <select name="browser">
  	  	  	<option value="chrome">Chrome</option>
  	  	  	<option value="firefox">FireFox</option>
  	  	  	<option value="safari">Safari</option>
  	  	  	<option value="other">Other</option>
  	  	  </select>
  	  	</label>
  	  </p>
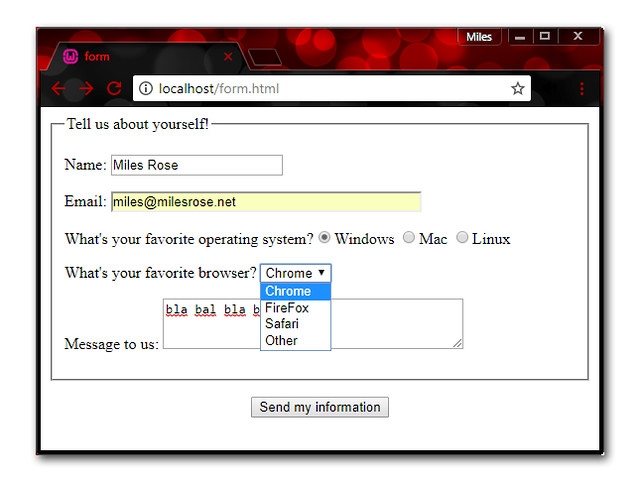
Here's a pull down menu, which starts with a select tag, and each option tag stands for a new line in the pull down menu. Here, four options are avalible. Similar to a radio button, only one option can be selected at a time.
1
		<p><label>Message to us: <textarea name="message" rows="3" cols="40"></textarea></label></p>
Here's a textarea, which are just another form of text input, which allow users to enter in much more information. Textareas are presented as a box, instead of a single line.
1
2
3
</fieldset>
  	  <p align="center"><input type="submit" name="submit" value="Send my information"></p>
  	</form>
Finally, this submit button is what actually sends the user's input to the PHP file that we are about to create. All of the data that the user entered will be accessable to PHP. The PHP program will store the user's data into variables, and then output those variables back to the browser. So far this post has only been about HTML, but not it's time to finally write some PHP to process this form! And at the same time, I'll introduce a new programming concept called conditionals, which we will use to process our form.
Conditionals
Conditionals allow for the execution of sections of code depending on whether or not a certain condition is true or not. For example:
1
2
3
4
5
6
7
8
9
	$a = 1;
	$b = 2;
	if ($a > $b) {
	    echo "a is bigger than b";
	} elseif ($a == $b) {
	    echo "a is equal to b";
	} else {
	    echo "a is smaller than b";
	}
The above code will output "a is smaller than b"
Now back to our form. Since the HTML form above says "form action="process_form.php" we'll have to also name our new PHP file process_form.php and enter the following code.
In this post, we'll create an HTML form and use PHP to handle submitted values. Understanding how to handle forms is important for developing most websites. First, we'll write the HTML form its self. Then, we'll write a PHP program that will receive and process the resulting form input. To create the HTML form, start with the form tags which look like this:
1
2
3
<form action="process_form.php" method="post">
</form>
Notice the action="process_form.php" part of the form tag. This controls which PHP file will be processing the HTML form. You'll also notice the method="post". There are two different form "methods" that are commonly used. There is method="post" and there is method="get". A "get" method means that the user input will be visible in the URL, for example http://something.com/script.php?name=Miles&gender=M The advantage of a "get" method is that the form's inputed values can easily be bookmarked by the user. The major disadvantage of the "get" method is security. anybody could just change those form values to whatever they wanted, and get around any input validation you may have set up to protect yourself from hacks. We'll get into input validation later on, but for the purposes of this series, I'll always lean toward the "post" method unless I have a very good reason not to.
Anyway, to get started, just make a new file called form.html
1
2
3
4
5
6
7
8
9
10
11
12
13
14
15
16
17
18
19
20
21
22
23
24
25
26
27
28
29
30
<!doctype html>
<html lang="en">
<head>
<meta charset="utf8">
<title>form</title>
</head>
<body>
<form action="process_form.php" method="post">
<fieldset>
<legend>Tell us about yourself!</legend>
<p><label>Name: <input type="text" name="name" size = "20" maxlength="40"></label></p>
<p><label>Email: <input type="email" name="email" size="40" maxlength="50"></label></p>
<p><label for="os">What's your favorite operating system?</label><input type="radio" name="os" value="Windows">Windows
<input type="radio" name="os" value="Mac">Mac
<input type="radio" name="os" value="Linux">Linux</p>
<p><label>What's your favorite browser?
<select name="browser">
<option value="chrome">Chrome</option>
<option value="firefox">FireFox</option>
<option value="safari">Safari</option>
<option value="other">Other</option>
</select>
</label>
</p>
<p><label>Message to us: <textarea name="message" rows="3" cols="40"></textarea></label></p>
</fieldset>
<p align="center"><input type="submit" name="submit" value="Send my information"></p>
</form>
</body>
</html>

Break it down!
Once again, I'll break this code into small chunks, and discuss them in detail.
1
<form action="process_form.php" method="post">
This form's action attribute points to a file called process_form.php, which we will create in the next step.
1
2
3
<fieldset>
<legend>Tell us about yourself!</legend>
...
The fieldsettags help group the form's content and add a box around it. This is optional, but I like the way it looks.
1
2
<p><label>Name: <input type="text" name="name" size = "20" maxlength="40"></label></p>
<p><label>Email: <input type="email" name="email" size="40" maxlength="50"></label></p>
These are textarea boxes for users to enter their name and emails. The label tags are used to associate each text label with it's corresponding input area
1
2
3
<p><label for="os">What's your favorite operating system?</label><input type="radio" name="os" value="Windows">Windows
<input type="radio" name="os" value="Mac">Mac
<input type="radio" name="os" value="Linux">Linux</p>
Radio buttons can only be selected one at a time. since these radio buttons all have the same "name" then only one can be seleced at a time.
1
2
3
4
5
6
7
8
9
<p><label>What's your favorite browser?
<select name="browser">
<option value="chrome">Chrome</option>
<option value="firefox">FireFox</option>
<option value="safari">Safari</option>
<option value="other">Other</option>
</select>
</label>
</p>
Here's a pull down menu, which starts with a select tag, and each option tag stands for a new line in the pull down menu. Here, four options are avalible. Similar to a radio button, only one option can be selected at a time.
1
<p><label>Message to us: <textarea name="message" rows="3" cols="40"></textarea></label></p>
Here's a textarea, which are just another form of text input, which allow users to enter in much more information. Textareas are presented as a box, instead of a single line.
1
2
3
</fieldset>
<p align="center"><input type="submit" name="submit" value="Send my information"></p>
</form>
Finally, this submit button is what actually sends the user's input to the PHP file that we are about to create. All of the data that the user entered will be accessable to PHP. The PHP program will store the user's data into variables, and then output those variables back to the browser. So far this post has only been about HTML, but not it's time to finally write some PHP to process this form! And at the same time, I'll introduce a new programming concept called conditionals, which we will use to process our form.
Conditionals
Conditionals allow for the execution of sections of code depending on whether or not a certain condition is true or not. For example:
1
2
3
4
5
6
7
8
9
$a = 1;
$b = 2;
if ($a > $b) {
echo "a is bigger than b";
} elseif ($a == $b) {
echo "a is equal to b";
} else {
echo "a is smaller than b";
}
The above code will output "a is smaller than b"
Now back to our form. Since the HTML form above says "form action="process_form.php" we'll have to also name our new PHP file process_form.php and enter the following code.